I have recently set up a clean Ruby on Rails setup as a preparation for the upcoming RailsGirls Frankfurt event. The guide will help you install Rails (4.0.4 as of now). I’d like to share it with you for easier reference.
Ruby 2.0.0
Let’s start with Ruby. The great folks over at RubyInstaller have packaged simple click-through installers for windows. Thanks! Head over there and go to their download page. It will list various ruby versions, if when in doubt, use Ruby 2.0.0-p451. There’s a note on 32bit vs. 64bit at the end of the article). After downloading, run the installer. If you have ever installed a program, this should not be a problem for you.
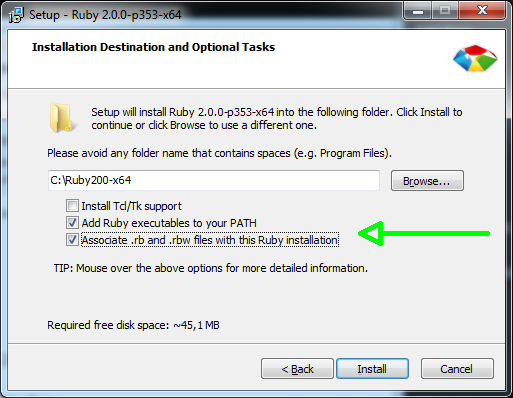
There’s one thing i like to do different from the default:
- i put my ruby in the PATH (second checkbox). This means that you can just type
rubyin your command line and it will know what to do. - i also associate .rb files with this installation (third checkbox). This way I can double-click a ruby script and it will run. This is not neccessary for Ruby on Rails, though.
If you were to open a command line, you could try this to confirm everything is fine (your exact version may vary):
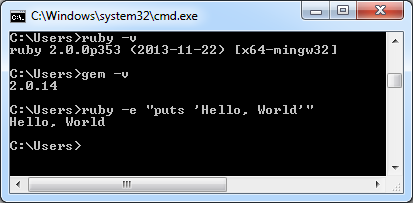
If it fails, try restarting your computer. In some setups and on older versions of windows, this is sometimes neccessary for the PATH (see above) to take effect.
Ruby DevKit
It’s no secret that development on Windows is a little harder, sometimes. The reason is, that Windows does not come with what’s called a build-environment. Don’t worry about that, the ruby community has you covered! Ruby DevKit to the rescue!
The DevKit is also provided by the RubyInstaller people. Their download page explains, which version is supposed to work with which ruby. If you chose 2.0.0, as mentioned above, you’ll want DevKit-mingw64-32-4.7.2.
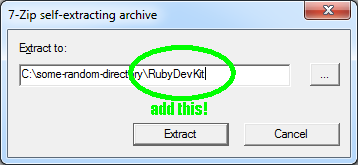
After downloading, you just need to unpack the DevKit anywhere. Just remember where. Oh, and… you should definitely add something to the unpack-location! If you don’t it will create a little mess.
The tricky thing about the DevKit is, that it’s only temporarily added to your console. If you can’t install any gem, try loading the devkit (see below) and then install the failed gems again.
Rails itself
With the preparation out of the way, we can now start installing Ruby on Rails itself. Ruby comes with something called gem. Gem will take care of downloading and installing things like Rails. Punch this into your Command Line:
C:\some-random-directory\RubyDevKit\devkitvars.bat
gem install rails
This will look like this, and after a few seconds should start to print lots of lines in your console. This is good. You can go grab a coffee, now. This is going to take a few minutes.
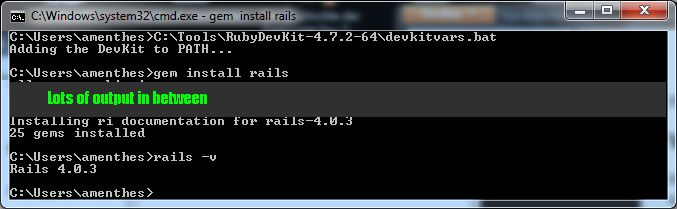
When everything is downloaded and installed, it will also generate documentation for rails and all the other parts. There is a way to skip those. If you don’t need these docs, you can run gem install rails --no-ri --no-rdoc instead. Personally, i like rdoc. But it’s ok if you’re in a hurry.
If everything went fine, you should have something like “25 gems installed” (number may vary). In the screenshot above, i tried the rails -v command. This will just print out the installed version – or greet you with some kind of error.
Here, everything went fine, and I could now start to build Applications in Ruby on Rails. But that’s not the point of this post. You’re all set up. Enjoy Rails!
Where to go from here?
Straight to the comments, of course! Did this guide work for you? Did i miss a step? Let me know! After this guide, one of the best places to start with Rails is a RailsGirls event. If there isn’t one in your city, you can also try their examples on your own. The materials are very well prepared.
32bit Ruby vs. 64bit Ruby – use 32bit for now
At the moment, i don’t recommend to use 64bit ruby on windows. This is not ruby’s fault, though. Ruby itself runs just fine. But you will run into a lot of problems with common gems like nokogiri, mysql, mysql2, net:ssh and the like.
I’ll keep trying and update this accordingly.
Changelog
- 25.02.2014: Altered Download-link for Ruby 2.0.0p451
- 17.03.2014: Rails 4.0.4 has been released. This will work exactly the same way as 4.0.3.
- 17.03.2014: 64bit warning added
worked for me! Thankx